Are you looking for a way to seamlessly control your Raspberry Pi from your Windows 11 machine? Then, understanding how to securely connect and manage your Raspberry Pi remotely via SSH (Secure Shell) is a critical skill. It opens up a world of possibilities, from headless operation to remote software updates and everything in between.
The quest to establish a secure connection to your Raspberry Pi from a Windows 11 environment often begins with a simple question, "How do I SSH into my Raspberry Pi from Windows 11?" The pursuit of this answer is not merely a technical exercise; it's a gateway to efficient project management, remote access capabilities, and a deeper understanding of your network infrastructure. SSH allows you to execute commands, transfer files, and manage your Raspberry Pi without physically interacting with it, making it an indispensable tool for any maker, developer, or hobbyist. The ability to remotely access your Raspberry Pi is often the difference between a fully functional project and one that sits gathering dust.
The pathway to achieving this connectivity unfolds in several key steps, each designed to establish a secure and reliable connection. You'll learn about the built-in SSH client in Windows 11, the popular PuTTY software, and even the intricacies of WSL (Windows Subsystem for Linux). The goal is to help you move beyond basic SSH and to become proficient at leveraging its power in your daily workflow.
First and foremost, it's important to understand that Windows 11 offers its own integrated SSH client, ready for action without needing to install any additional software. Windows 11 has come a long way, with the built-in command-line tools offering powerful options.
To begin, you can use this integrated client, which can be accessed through the Command Prompt or Windows PowerShell. Accessing either is straightforward; simply click the Start menu and type "cmd" or "powershell" and press Enter. This is where the magic begins, as you prepare to send commands to your Raspberry Pi.
However, there are alternative avenues to connect to the Raspberry Pi as well. Consider using an application like PuTTY, a free and open-source SSH client, which has long been a favourite in the Windows world. Another method is to use WSL. Before we dive into the specific steps, consider the following points to help ensure that you can easily connect.
For the sake of clarity, we will outline several methods of achieving a connection to your Raspberry Pi.
The journey to connecting your Raspberry Pi with SSH starts before you even open your laptop. If you're setting up your Raspberry Pi in a "headless mode" meaning without a monitor, keyboard, or mouse youll need to prepare the SD card. Remove the storage device from the Raspberry Pi, insert it into your computer and follow the steps.
With the SD card prepared, navigate to the `/bootfs` or `/boot` directory, the specific name depends on your operating system and create an empty file and name it ssh.
Once the Raspberry Pi is set up, the next step is to get everything updated, and you can log in via SSH.
If you want to SSH into your Pi from WSL, make sure your Raspberry Pi and your Windows machine are connected to the same network.
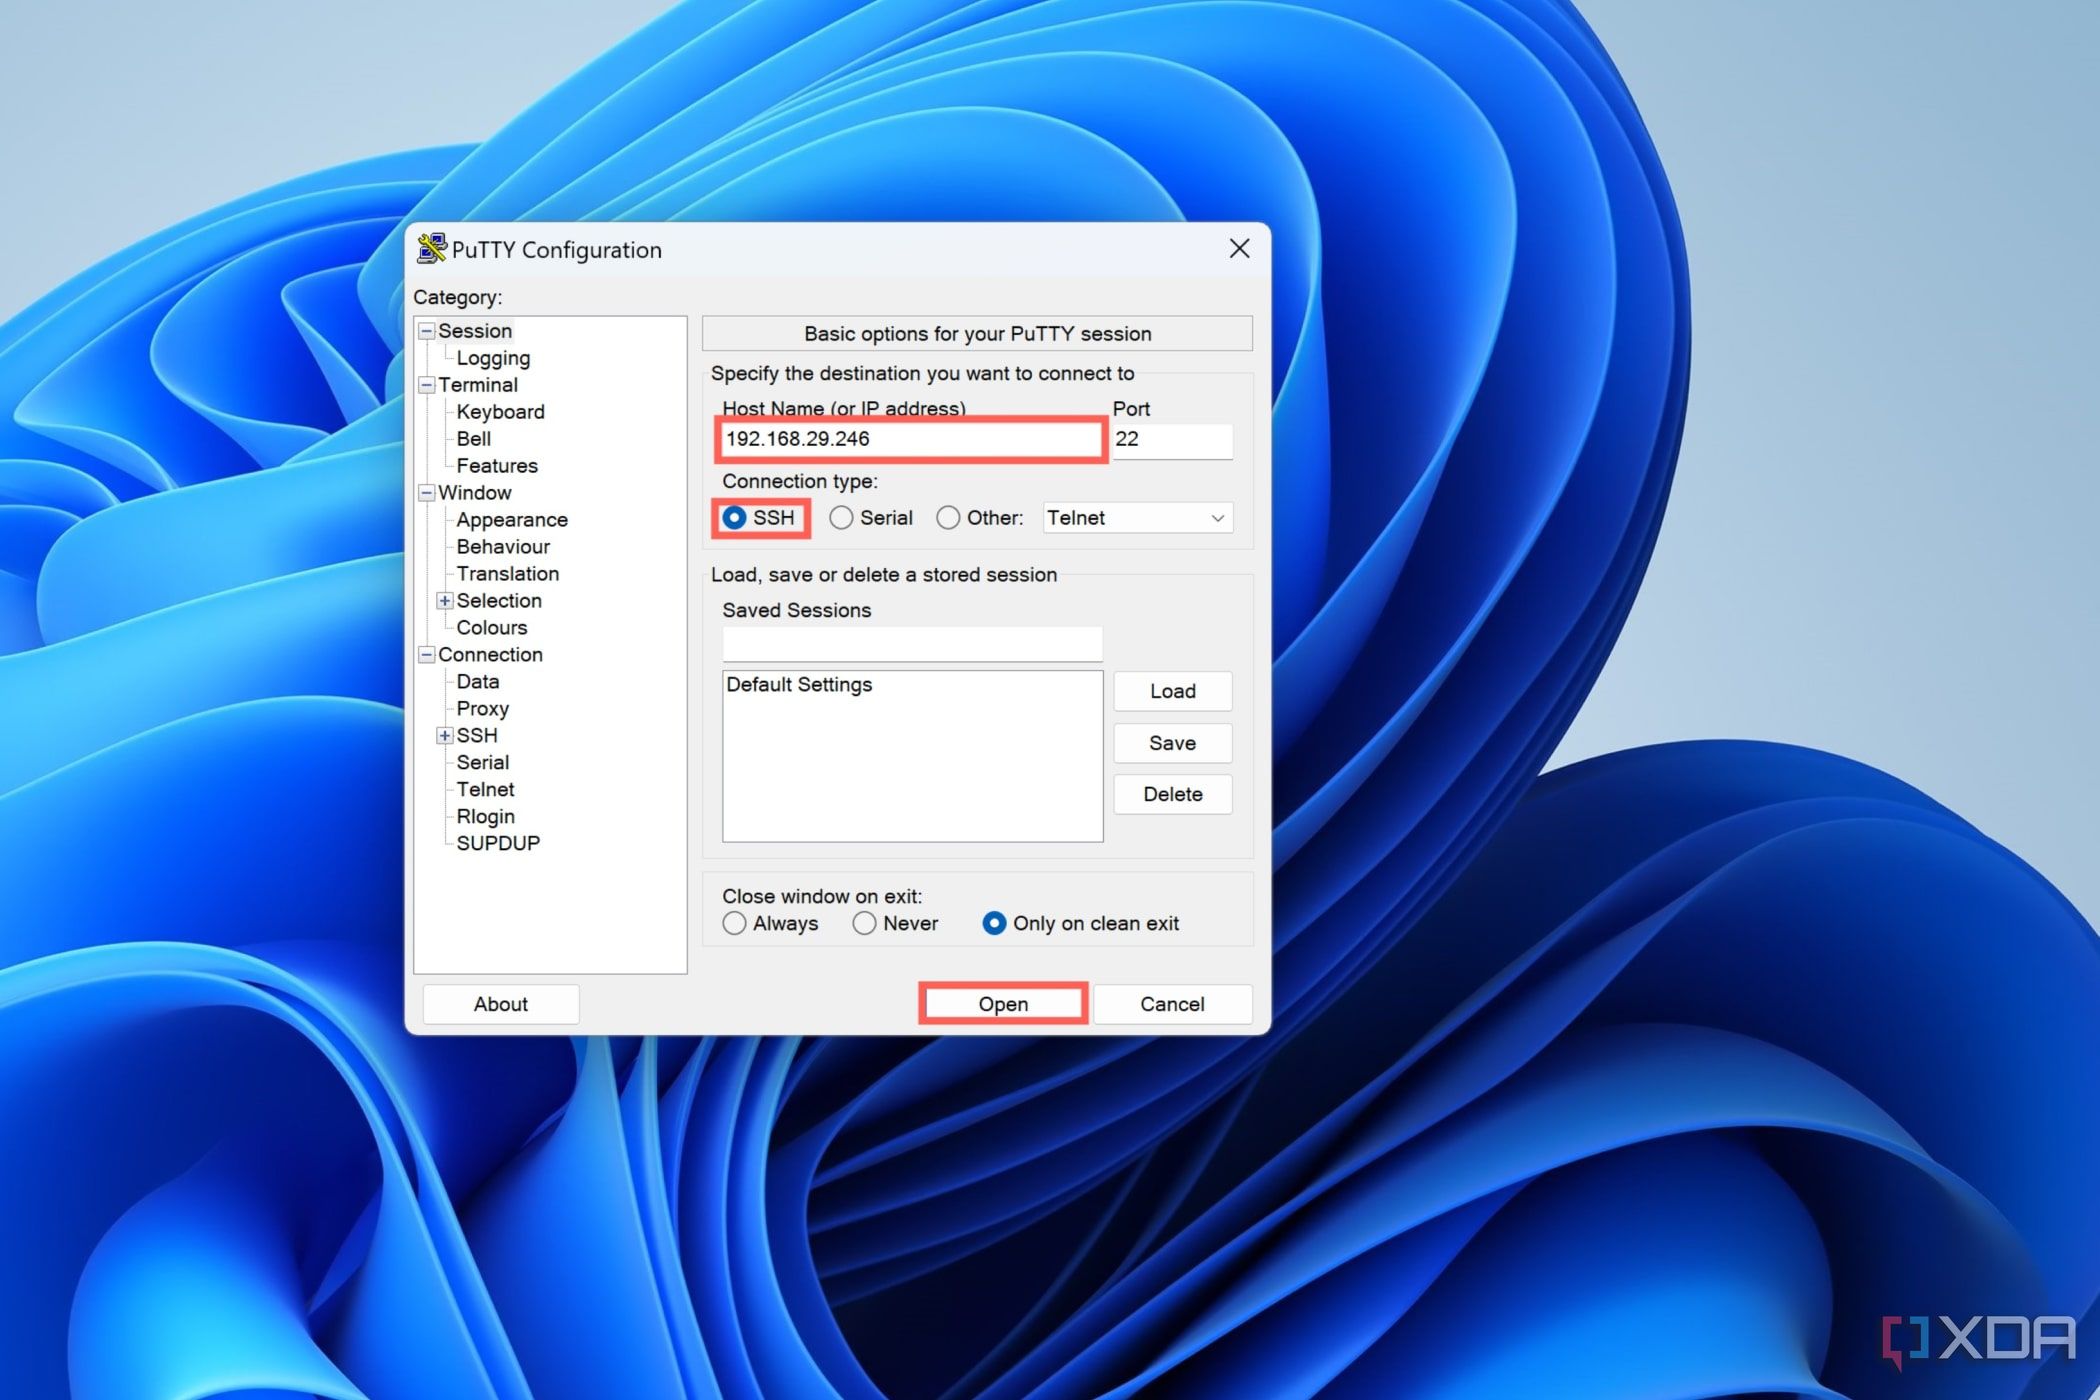
The first option to connecting to your Raspberry Pi is the use of PuTTY. It's a freely available SSH client for Windows and offers a user-friendly interface for connecting to your Raspberry Pi. It is open-source and supported by a team of volunteers.
To make a connection using PuTTY, you will need the IP address of your Raspberry Pi. In the hostname field, you will type the IP address or use `raspberrypi.local` as a default. The port field should be set to 22, and the connection type should be SSH. Once you have these settings entered, click "Open" to start the connection. You will then be asked for your login credentials, specifically your username and password for your Raspberry Pi.
When it comes to securely accessing your Raspberry Pi remotely, the combination of SSH and the right settings is crucial. For instance, if your network is configured in a particular way, such as having a static IP, it simplifies the SSH process. For example, if your Ethernet configuration is set up so that your Windows laptop has the IP address 192.168.0.1, you can easily SSH into your Raspberry Pi through the Ethernet connection.
SSH allows remote access to another computer, providing a secure way to control, manage, and execute commands on your Raspberry Pi from your Windows PC. It's a vital tool for remote access to another computer.
If you connect to your Raspberry Pi frequently using SSH or a remote desktop application, consider that Wi-Fi might not always be the best choice. While convenient, Wi-Fi can be slower and less reliable than a direct Ethernet connection.
Now comes the part where the Raspberry Pi accesses the internet of your machine, by creating a connection to your Windows 11 machine and allowing you to utilize the same internet connection.
I can putty into the pi from windows using Pageant to establish an SSH connection using the pub key generated by the Raspberry Pi image installer and the corresponding private key generated locally. It is authenticated by providing the same pass code when logging in via PuTTY.
The goal is to create a functional, password-less method for accessing the Raspberry Pi.
Here's a simple table that provides a summary of the steps to SSH into a Raspberry Pi from Windows 11.
| Action | Description | Tool/Method |
|---|---|---|
| Enable SSH on Raspberry Pi | Ensure SSH is enabled on the Raspberry Pi. | Headless Setup: Create an empty file named 'ssh' in the boot partition of the SD card. |
| Find the Raspberry Pi's IP Address | Locate the IP address of your Raspberry Pi on your network. | Check your router's admin panel, use an IP scanner, or use `raspberrypi.local`. |
| Using Windows Integrated SSH Client | Utilize the built-in SSH client in Windows 11. | Open Command Prompt or PowerShell, type `ssh pi@`, enter password when prompted. |
| Using PuTTY | Use the popular PuTTY SSH client. | Enter Raspberry Pi's IP address, port 22, and SSH as the connection type in PuTTY; enter login credentials. |
| Connecting via WSL | SSH into the Pi using the Windows Subsystem for Linux. | Use the SSH command from your WSL terminal. |
| Passwordless SSH (Advanced) | Set up passwordless SSH access for improved convenience and security. | Generate SSH keys, copy the public key to the Raspberry Pi, and configure SSH to use the key. |
This article, and its step-by-step approach to enabling SSH on your Raspberry Pi and connecting to it from Windows 11, offers a solid foundation for anyone interested in remote access. Whether you're a hobbyist or a professional, mastering these techniques will undoubtedly enhance your ability to work with Raspberry Pi projects.