Can you truly harness the power of your Raspberry Pi, regardless of your location, with just an internet connection? The answer, unequivocally, is yes. Remote access to your Raspberry Pi is not only possible but surprisingly straightforward, opening a world of possibilities for projects, management, and control from virtually anywhere.
The ability to remotely control a Raspberry Pi has become increasingly vital in today's interconnected world. Whether you're a seasoned hobbyist, an educator, or a professional working on embedded systems, the capability to access and manage your device without being physically present is invaluable. From monitoring home automation systems to debugging software remotely, the applications are vast and varied. But how do you actually achieve this remote access? There are several methods to choose from, each with its own set of advantages and considerations.
| Feature | Description |
|---|---|
| Remote Access Methods | Expose SSH or VNC, Raspberry Pi Connect, Web SSH |
| SSH and VNC | Utilizing SSH or VNC over the open internet, within a VPN, or through an external service like RealVNC's cloud viewer. This method gives you direct control over the terminal or a graphical desktop. |
| Raspberry Pi Connect | A free screen sharing and remote shell service provided directly by Raspberry Pi. It simplifies the connection process for those looking for a straightforward experience. |
| Web SSH Access | This method leverages a web browser to connect to your Raspberry Pi. It removes the need for dedicated terminal applications, making it ideal for users on the go. |
| Benefits of Web SSH | Especially helpful for frequent travelers or remote workers, providing access without the need for specific software. |
| Security Considerations | SSH is disabled by default in Raspberry Pi OS for security reasons. Enabling it requires understanding of secure configurations. |
Before delving into the methods, it's important to address a fundamental aspect of remote access: security. By default, SSH (Secure Shell) is disabled in the Raspberry Pi OS for security purposes. This is a crucial measure designed to protect your device from unauthorized access. To enable SSH, you're essentially opening a doorway to your Raspberry Pi, and as such, you must take the necessary precautions to secure it. This typically involves choosing strong passwords, keeping the system updated with the latest security patches, and, depending on the method, configuring firewalls or using VPNs.
Now, let's explore the methods available for achieving remote control. One of the most common approaches involves exposing either SSH or VNC (Virtual Network Computing) over the internet. This can be accomplished in several ways: directly over the open internet (with significant security caveats), within a Virtual Private Network (VPN), or by utilizing an external service such as RealVNCs cloud VNC viewer. SSH provides command-line access, allowing you to execute commands remotely, while VNC offers a graphical desktop environment, mirroring the Raspberry Pi's display on your remote device.
Another option is to use Raspberry Pi Connect, a free screen-sharing and remote shell service provided directly by Raspberry Pi. This service streamlines the connection process, making it an appealing choice for those seeking a simpler setup. With Raspberry Pi Connect, the configuration is often easier than setting up SSH or VNC directly.
Web SSH access represents another convenient method. Web SSH allows users to connect to their Raspberry Pi using a web browser, eliminating the need for dedicated terminal applications like PuTTY or Terminal. This approach is particularly beneficial for those who frequently travel or work remotely, as it provides access from virtually any device with a web browser. This method requires you to install a web server and a web-based SSH client on your Raspberry Pi.
One of the key advantages of web SSH access is its portability. All you need is a web browser, which is readily available on almost every device. This eliminates the need to install and configure specific terminal software on each device you use. The setup, while requiring a few additional steps, provides a more accessible experience, especially for less technically inclined users.
To utilize SSH over the internet, a few preliminary steps are essential. First, you must connect your Raspberry Pi to the internet. This can be achieved through an Ethernet connection or by configuring a Wi-Fi connection. Ensure that your Raspberry Pi has a stable internet connection, as this is the lifeline for remote access. Once connected, you'll need to enable SSH. As mentioned earlier, SSH is disabled by default in the Raspberry Pi OS.
There are several methods to enable SSH. The most straightforward, especially for "headless" setups (those without a monitor, keyboard, or mouse), is using the Raspberry Pi Imager. The Raspberry Pi Imager tool now offers advanced options that allow you to configure SSH during the OS installation process. During the process of writing the OS image to your microSD card, you can enable SSH, set a username and password, and even configure your Wi-Fi settings. This proactive approach simplifies the initial setup, particularly for users who don't want to connect a monitor and keyboard to their Raspberry Pi.
SSH, or Secure Shell, is a fundamental protocol in Linux systems. It allows you to execute commands from another computer, effectively giving you remote control over the command line. Before an SSH client from another computer can connect, the SSH service must be enabled within the Raspberry Pis configuration. This protocol uses encryption to secure the connection, ensuring that data transmitted between your computer and the Raspberry Pi remains private.
To enable SSH, if you are not using the Raspberry Pi Imager to do so during the initial OS installation, you may follow these steps. Firstly, connect your Raspberry Pi to the internet. After connecting your Raspberry Pi to a monitor, keyboard, and mouse, log in to the Raspberry Pi OS. Open the terminal application (or use the command-line interface if no graphical environment is present) and enter the command "sudo raspi-config". This command opens the Raspberry Pi configuration tool.
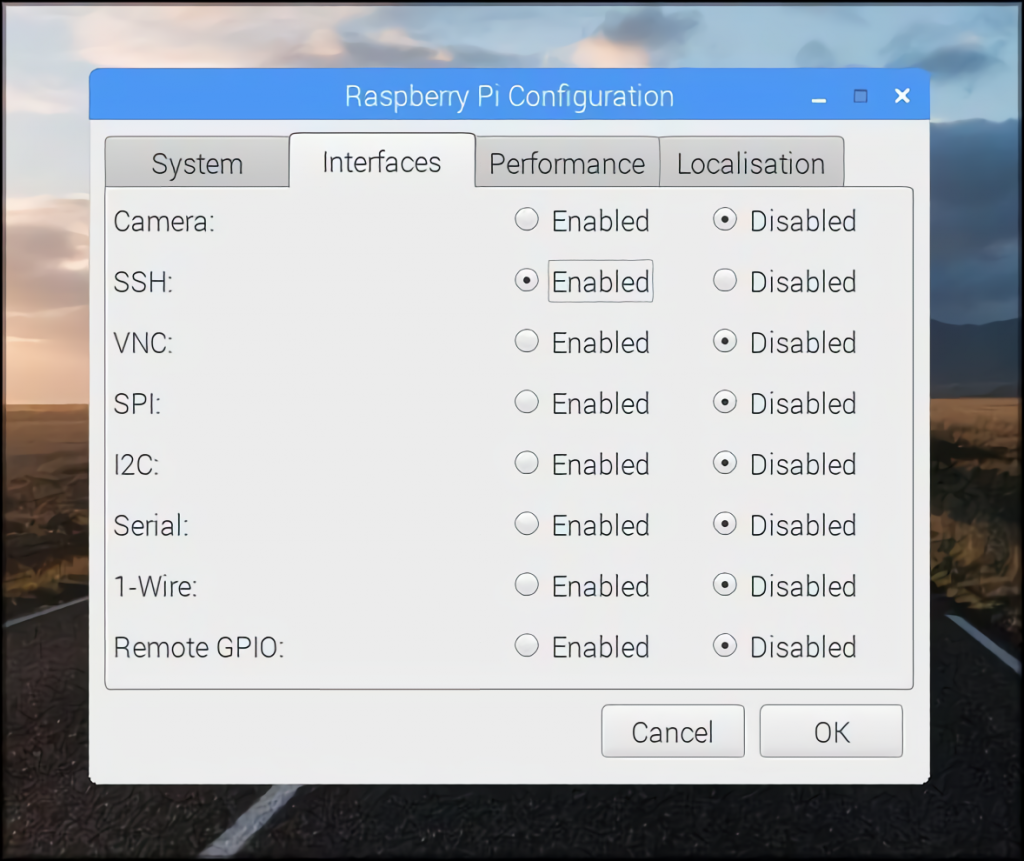
Within the configuration tool, navigate to "Interface Options." In the "Interface Options," select "SSH." You will then be prompted to enable or disable the SSH server. Select "Enable" to turn SSH on. You will also be given the option to change the hostname and set a static IP address. It is recommended to change the default password for security reasons as well.
There are a few approaches to connect your Raspberry Pi to the internet. You can use an Ethernet cable connected directly to your router or use a Wi-Fi connection. Connecting via Ethernet offers a more stable and reliable connection. If you choose Wi-Fi, you will have to configure your Wi-Fi settings during the initial setup.
Once the Raspberry Pi has been connected to the internet and SSH has been enabled, you need to find the IP address of the Raspberry Pi. The IP address is the unique identifier that will allow you to connect to your device remotely. You can find the IP address in a few ways. One way is to log in to the Raspberry Pi and use the "ifconfig" command in the terminal. This command displays network interface information, including the IP address. Another way is to log in to your router's administration panel. The router usually lists all devices connected to the network, along with their IP addresses.
To connect to the Raspberry Pi from another computer, youll need an SSH client. On Linux or macOS, the terminal application includes a built-in SSH client. On Windows, you can use an application like PuTTY or the built-in Windows Terminal. Once you have an SSH client, you can connect using the following command format: ssh [username]@[IP address]. Replace "[username]" with your Raspberry Pi username (typically "pi") and "[IP address]" with the IP address you obtained earlier. For example, the command might look like this: ssh pi@192.168.1.100.
After entering the command, you may be prompted to enter the password for your Raspberry Pi account. Enter the password and press Enter. You should then be logged into the Raspberry Pi's terminal. Now, you can run commands as if you were sitting in front of the Raspberry Pi. This opens the door to manage files, install software, monitor system resources, and much more.
Web SSH Access is a practical alternative or supplement to the standard SSH client applications. It offers an accessible solution, particularly for those who travel, or work from a variety of locations and devices.
The Raspberry Pi Imager is the fastest and most straightforward way to get an OS onto an SD card. Its available for Windows, macOS, and Linux and guides you through the process, making it perfect for beginners.
Enabling SSH on Raspberry Pi OS Desktop is a slightly different process. It is not enabled by default, however, it can be easily enabled through the Raspberry Pi configuration tool.
Setting up SSH over the internet offers unparalleled convenience, allowing you to manage your Raspberry Pi from anywhere in the world. From basic home automation to advanced system administration, the possibilities are vast.
Security must be a paramount concern when allowing remote access. Always change the default password for the 'pi' user and consider using a strong, unique password. Enable two-factor authentication (2FA) when possible. Consider configuring a firewall to restrict access to only necessary ports. Keeping the Raspberry Pi's operating system and all installed software updated is an ongoing requirement to patch security vulnerabilities.
For more details, you may consult: Raspberry Pi Official Website